Developer Guide
Table of Contents
- Table of Contents
- Acknowledgements
- Setting up, getting started
- Design
- Implementation
- Documentation, logging, testing, configuration, dev-ops
- Appendix: Requirements
- Appendix: Instructions for manual testing
Acknowledgements
- EZLead is evolved from AddressBook Level 3, a desktop app that manage contacts through CLI.
Setting up, getting started
Refer to the guide Setting up and getting started.
Design
 Tip: The
 .puml files used to create diagrams in this document can be found in the diagrams folder. Refer to the PlantUML Tutorial at se-edu/guides to learn how to create and edit diagrams.
Architecture
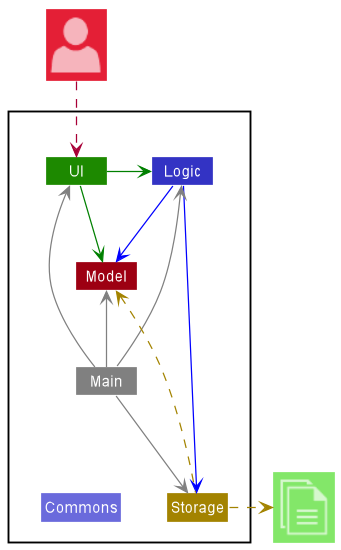
The Architecture Diagram given above explains the high-level design of the App.
Given below is a quick overview of main components and how they interact with each other.
Main components of the architecture
Main has two classes called Main and MainApp. It is responsible for,
- At app launch: Initializes the components in the correct sequence, and connects them up with each other.
- At shut down: Shuts down the components and invokes cleanup methods where necessary.
Commons represents a collection of classes used by multiple other components.
The rest of the App consists of four components.
-
UI: The UI of the App. -
Logic: The command executor. -
Model: Holds the data of the App in memory. -
Storage: Reads data from, and writes data to, the hard disk.
How the architecture components interact with each other
The Sequence Diagram below shows how the components interact with each other for the scenario where the user issues the command delete 1.
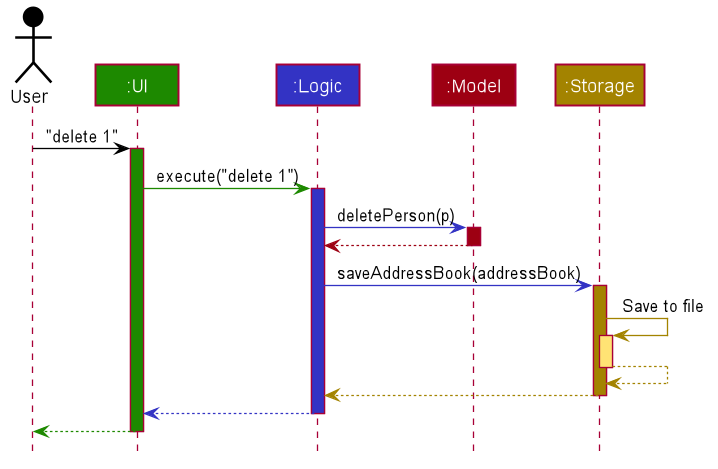
Each of the four main components (also shown in the diagram above),
- defines its API in an
interfacewith the same name as the Component. - implements its functionality using a concrete
{Component Name}Managerclass (which follows the corresponding APIinterfacementioned in the previous point.
For example, the Logic component defines its API in the Logic.java interface and implements its functionality using the LogicManager.java class which follows the Logic interface. Other components interact with a given component through its interface rather than the concrete class (reason: to prevent outside component’s being coupled to the implementation of a component), as illustrated in the (partial) class diagram below.
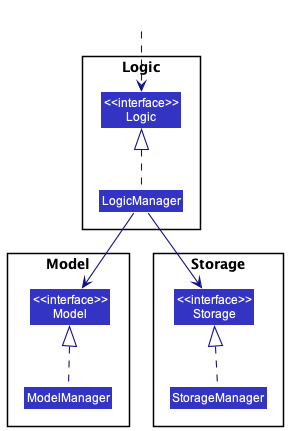
The sections below give more details of each component.
UI component
The API of this component is specified in Ui.java
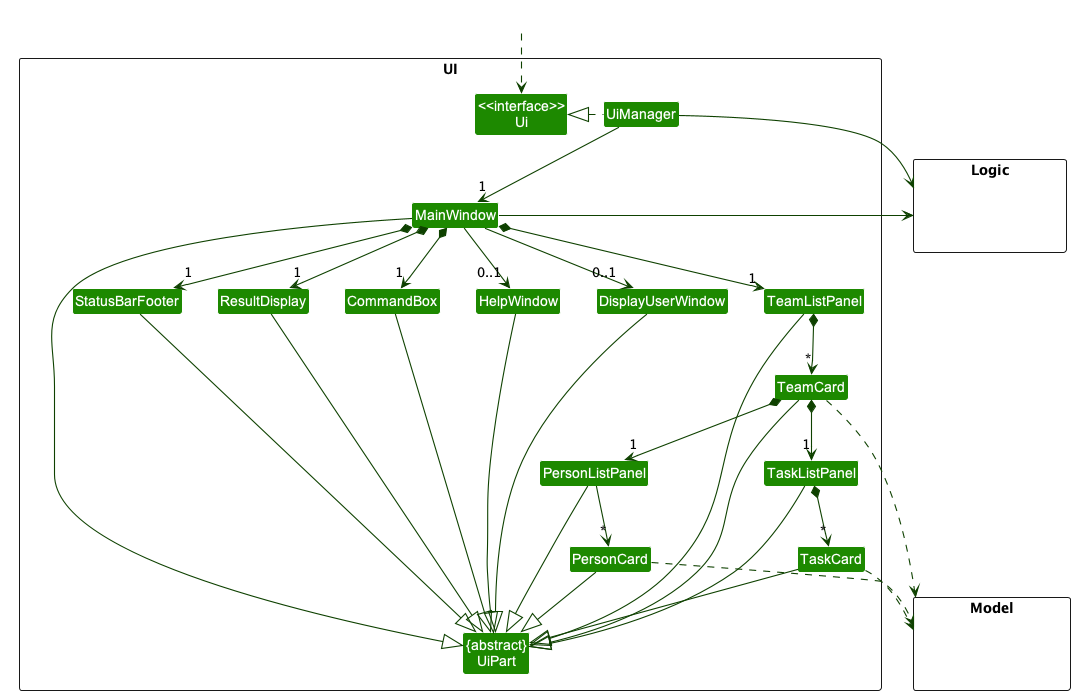
The UI consists of a MainWindow that is made up of parts e.g.CommandBox, ResultDisplay, PersonListPanel, StatusBarFooter TeamListPanel, TaskListPanel , DisplayUserWindow etc. All these, including the MainWindow, inherit from the abstract UiPart class which captures the commonalities between classes that represent parts of the visible GUI.
The UI component uses the JavaFx UI framework. The layout of these UI parts are defined in matching .fxml files that are in the src/main/resources/view folder. For example, the layout of the MainWindow is specified in MainWindow.fxml
The UI component,
- executes user commands using the
Logiccomponent. - listens for changes to
Modeldata so that the UI can be updated with the modified data. - keeps a reference to the
Logiccomponent, because theUIrelies on theLogicto execute commands. - depends on some classes in the
Modelcomponent, as it displaysTeamobject residing in theModel.
Logic component
API : Logic.java
Here’s a (partial) class diagram of the Logic component:
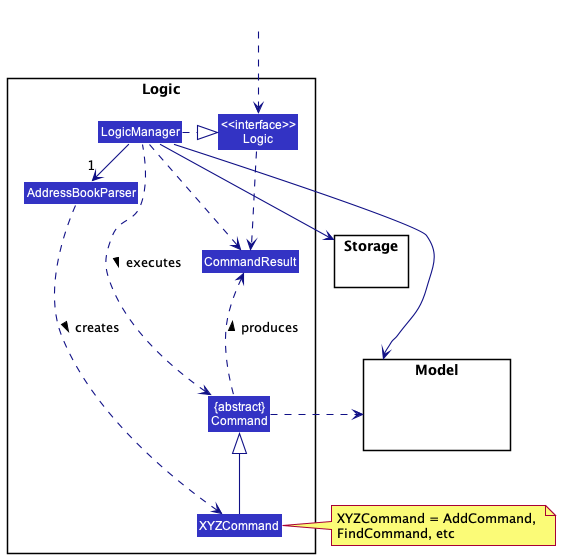
How the Logic component works:
- When
Logicis called upon to execute a command, it uses theAddressBookParserclass to parse the user command. - This results in a
Commandobject (more precisely, an object of one of its subclasses e.g.,AddCommand) which is executed by theLogicManager. - The command can communicate with the
Modelwhen it is executed (e.g. to add a person). - The result of the command execution is encapsulated as a
CommandResultobject which is returned back fromLogic.
The Sequence Diagram below illustrates the interactions within the Logic component for the execute("delete 1") API call.
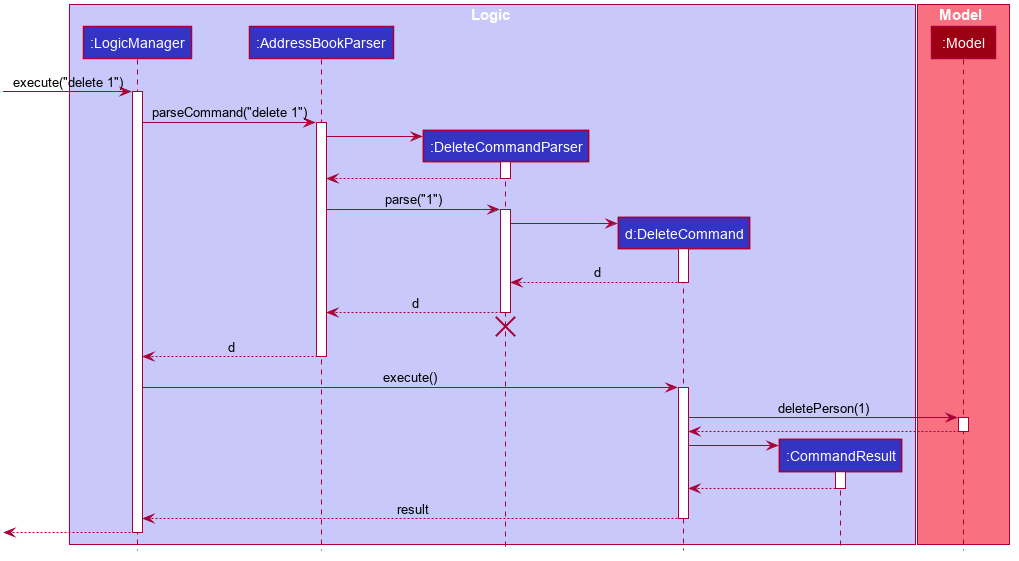
 Note: The lifeline for
 DeleteCommandParser should end at the destroy marker (X) but due to a limitation of PlantUML, the lifeline reaches the end of diagram.
Here are the other classes in Logic (omitted from the class diagram above) that are used for parsing a user command:
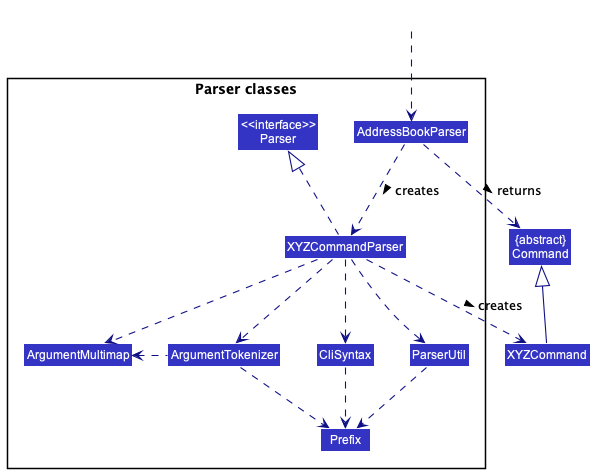
How the parsing works:
- When called upon to parse a user command, the
AddressBookParserclass creates anXYZCommandParser(XYZis a placeholder for the specific command name e.g.,AddCommandParser) which uses the other classes shown above to parse the user command and create aXYZCommandobject (e.g.,AddCommand) which theAddressBookParserreturns back as aCommandobject. - All
XYZCommandParserclasses (e.g.,AddCommandParser,DeleteCommandParser, …) inherit from theParserinterface so that they can be treated similarly where possible e.g, during testing.
Model component
API : Model.java
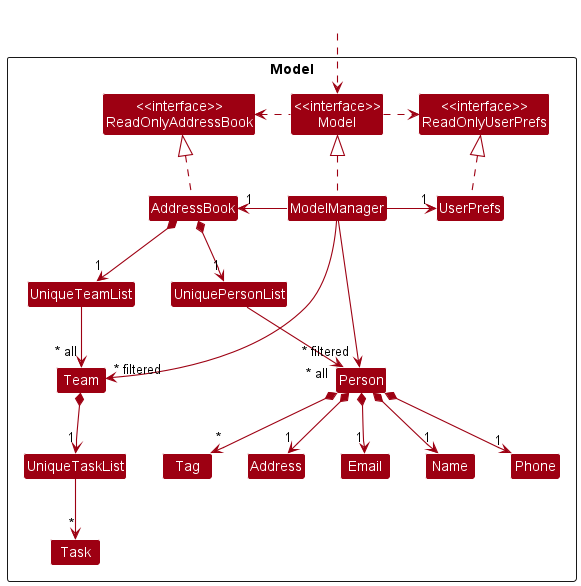
The Model component,
- stores the address book data. This address book data consists of:
- all
Personobjects (which are contained in aUniquePersonListobject), - all
Teamobjects (which are contained in aUniqueTeamListobject),
- all
- stores the currently ‘selected’
Person, andTeamobjects (e.g., results of a search query) as a separate filtered list which is exposed to outsiders as an unmodifiableObservableList<Person>andObservableList<Team>respectively, that can be ‘observed’ e.g. the UI can be bound to this list so that the UI automatically updates when the data in the list change. - stores a
UserPrefobject that represents the user’s preferences. This is exposed to the outside as aReadOnlyUserPrefobjects. - does not depend on any of the other three components (as the
Modelrepresents data entities of the domain, they should make sense on their own without depending on other components)
Note: An alternative (arguably, a more OOP) model is given below. It has a Tag list in the AddressBook, which Person references. This allows AddressBook to only require one Tag object per unique tag, instead of each Person needing their own Tag objects.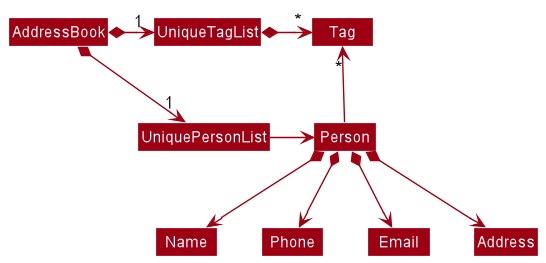
Storage component
API : Storage.java
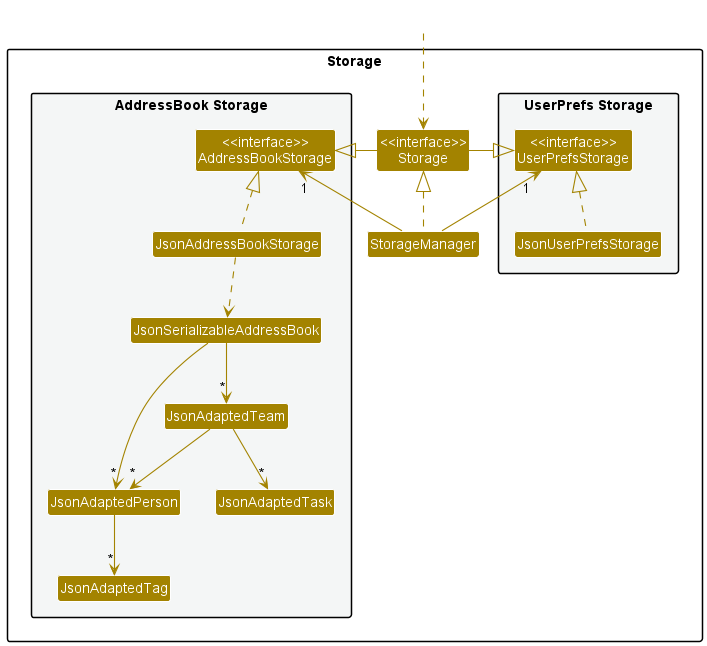
The Storage component,
- can save both address book data and user preference data in json format, and read them back into corresponding objects.
- inherits from both
AddressBookStorageandUserPrefStorage, which means it can be treated as either one (if only the functionality of only one is needed). - depends on some classes in the
Modelcomponent (because theStoragecomponent’s job is to save/retrieve objects that belong to theModel)
Common classes
Classes used by multiple components are in the seedu.address.commons package.
Implementation
This section describes some noteworthy details on how certain features are implemented.
Edit Person Feature
Implementation
The edit person feature edits the information of a person in EZLead, this change is reflected within all teams containing the edited person. The editable information are name, phone number, email address, physical address and tag.
Given below is an example usage scenario
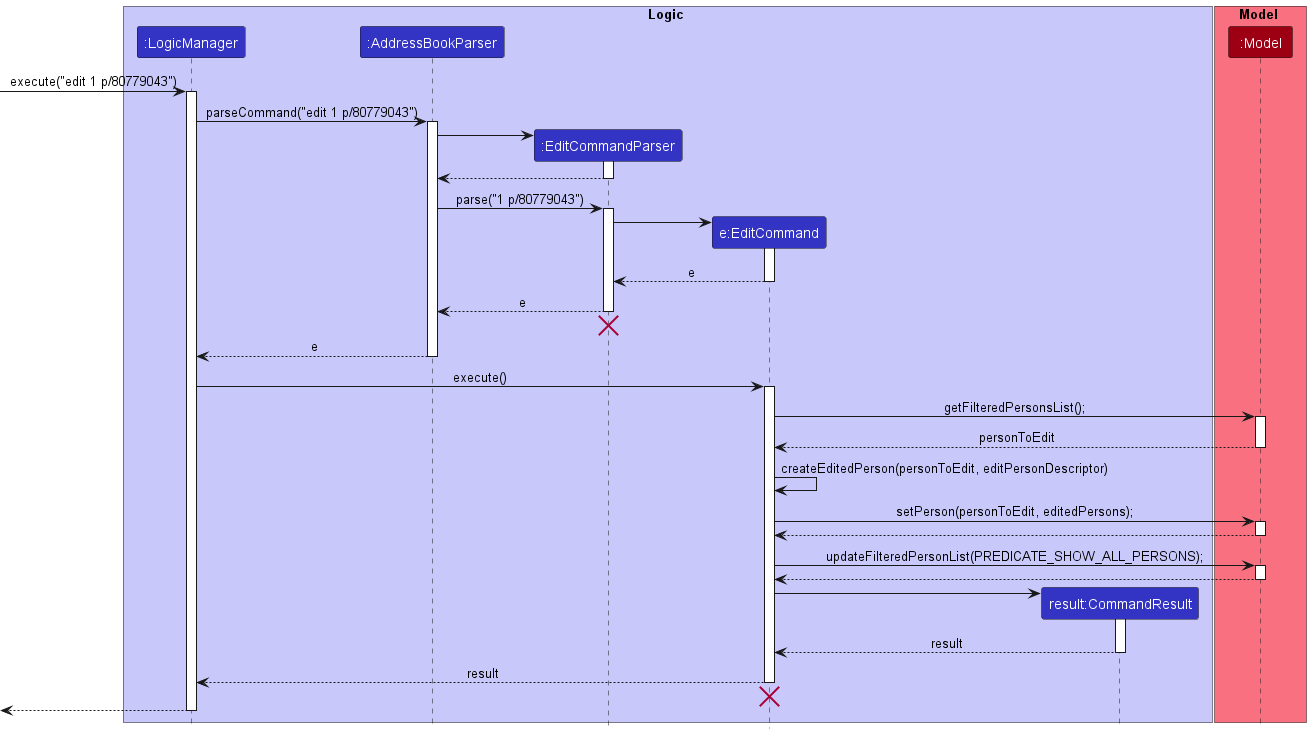
Step 1. The user wants to change the phone number of a person to 80779043. Said person is indexed number 1 in
the global list. The user executes edit 1 p/80779043.
Step 2. The parser will create an edit command. This edit command will call Model#getFilteredList()
to get the person specified by the index in the command then create a new person with the modified info.
Model#updateFiltedPersonList is called to update all teams with the edited members.
The following sequence diagram shows how the edit task operation works:
Create Team Feature
Implementation
The Create Team Feature allows the user to create a team in EZLead. Team will be stored in a global team list
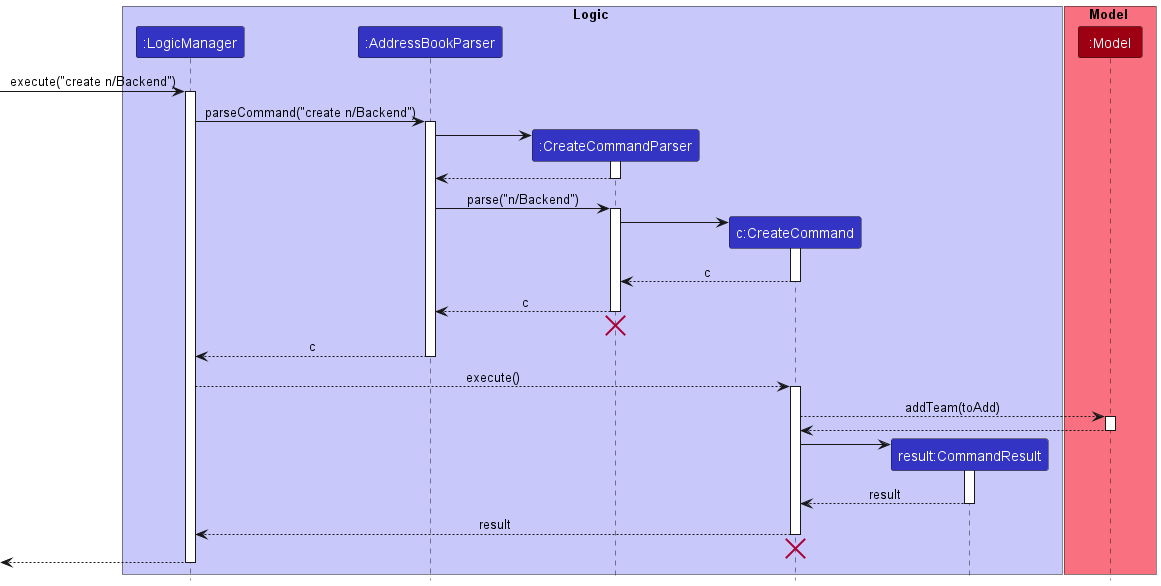
Step 1. The user wants to create a team named Backend. The user executes create n/Backend.
Step 2. The parser will create a team object and a CreateTeam command containing created team.
The CreateTeam command will call Model#addTeam to add the team into EZLead.
The following sequence diagram show how the create team operation works:
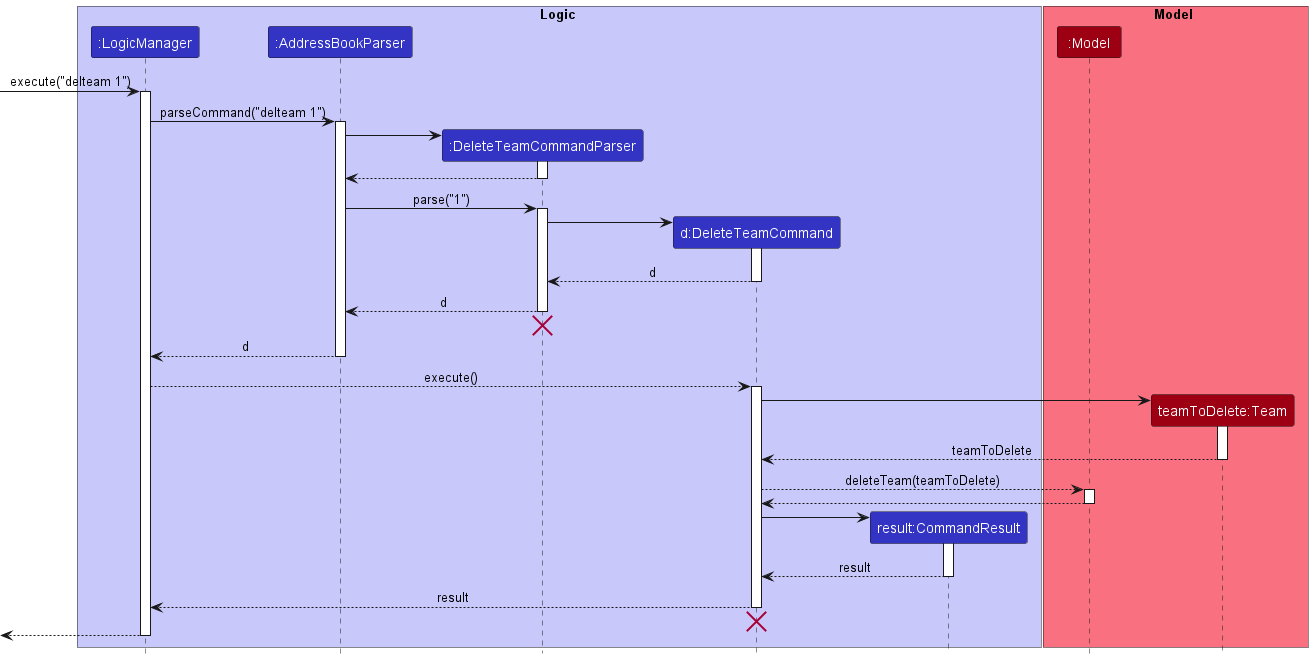
Delete Team Feature
Implementation
The Delete Team Feature allows the user to delete a team in EZLead. After deletion, the team will no longer be reflected in the Graphical User Interface.
Given below is an example usage scenario
Step 1. The user created a team using the create command.
Step 2. The user assigns some members into the newly created team using the assign command.
Step 3. The user realises that the team has completed their work and is no longer needed, and proceeds to delete the team using the delteam 1 command (Given that the team created in Step 1 is the team in index 1).
The following sequence diagram shows how the delete team operation works:
Edit Team Feature
Implementation
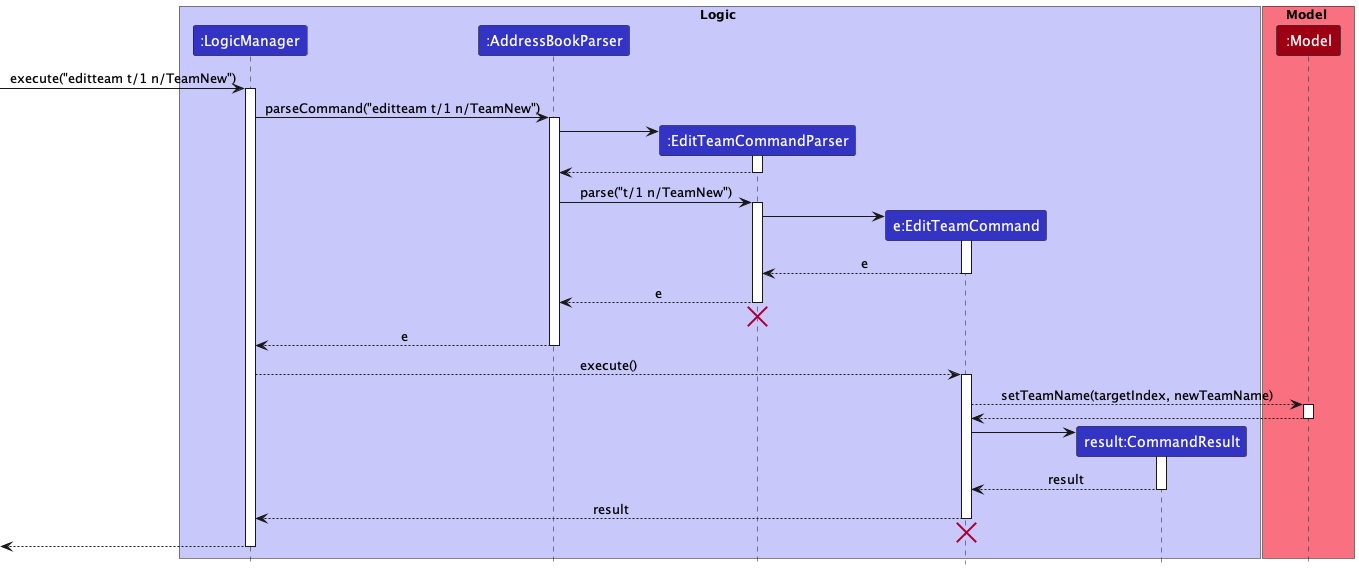
The Edit Team Feature allows the user to edit the name of an existing team in EZLead.
Given below is an example usage scenario and how the Edit Team mechanism behaves at each step.
Step 1. The user executes editteam t/1 n/Team1 to change the name of first team to Team1.
Step 2. The EditTeam command is created by the parser using the given team index and new name. It calls
Model#setTeamNameto change the name of the required team.
The following sequence diagram shows how the edit team operation works:
Assign Member Feature
Implementation
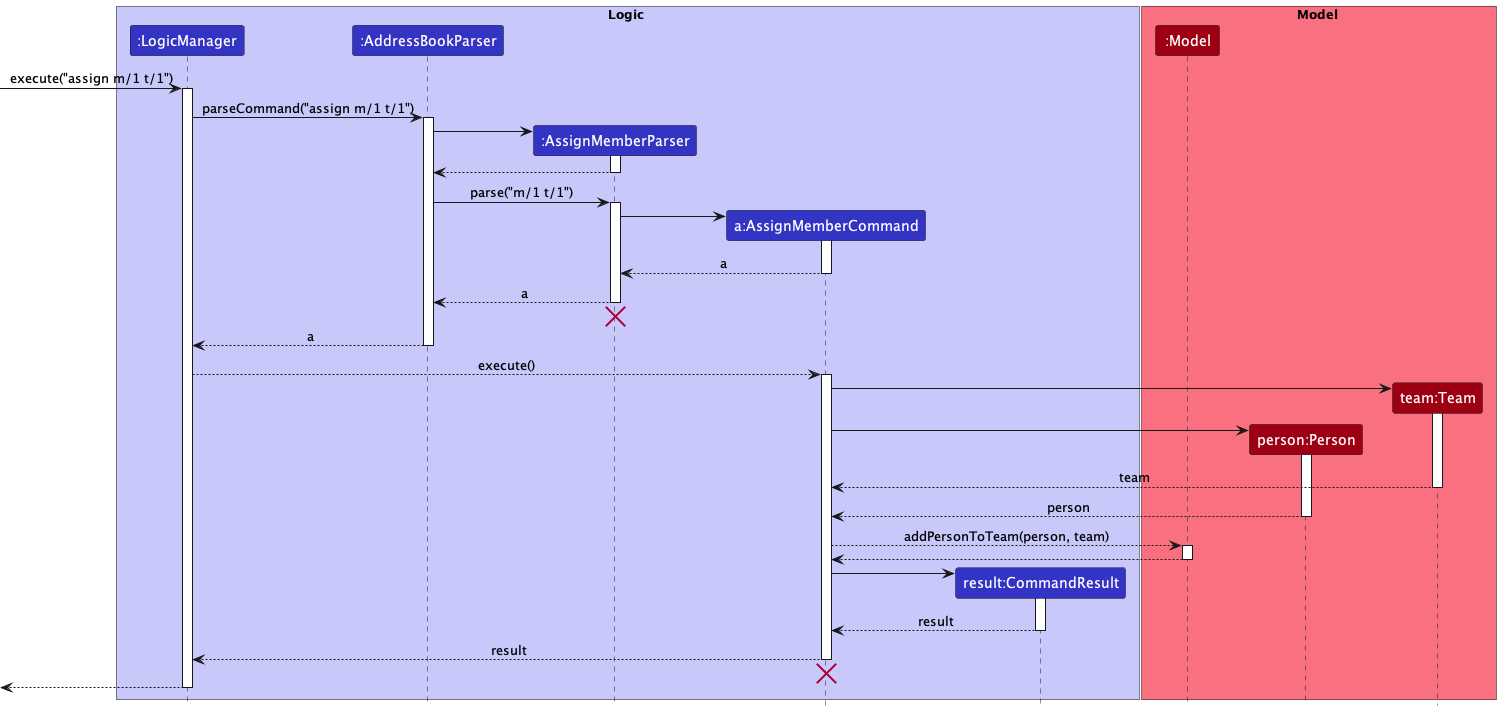
The Assign Member Feature allows the user to assign a person to an existing team in EZLead.
Given below is an example usage scenario and how the Assign Member mechanism behaves at each step.
Step 1. The user executes assign m/1 t/1 to assign the first person as a member in the first team.
Step 2. The AssignMember command is created by the parser using the given member’s index (global person index) and
team’s index. It calls Model#addPersonToTeam to add the person to given team.
The following sequence diagram shows how the assign member operation works:
Unassign Member Feature
Implementation
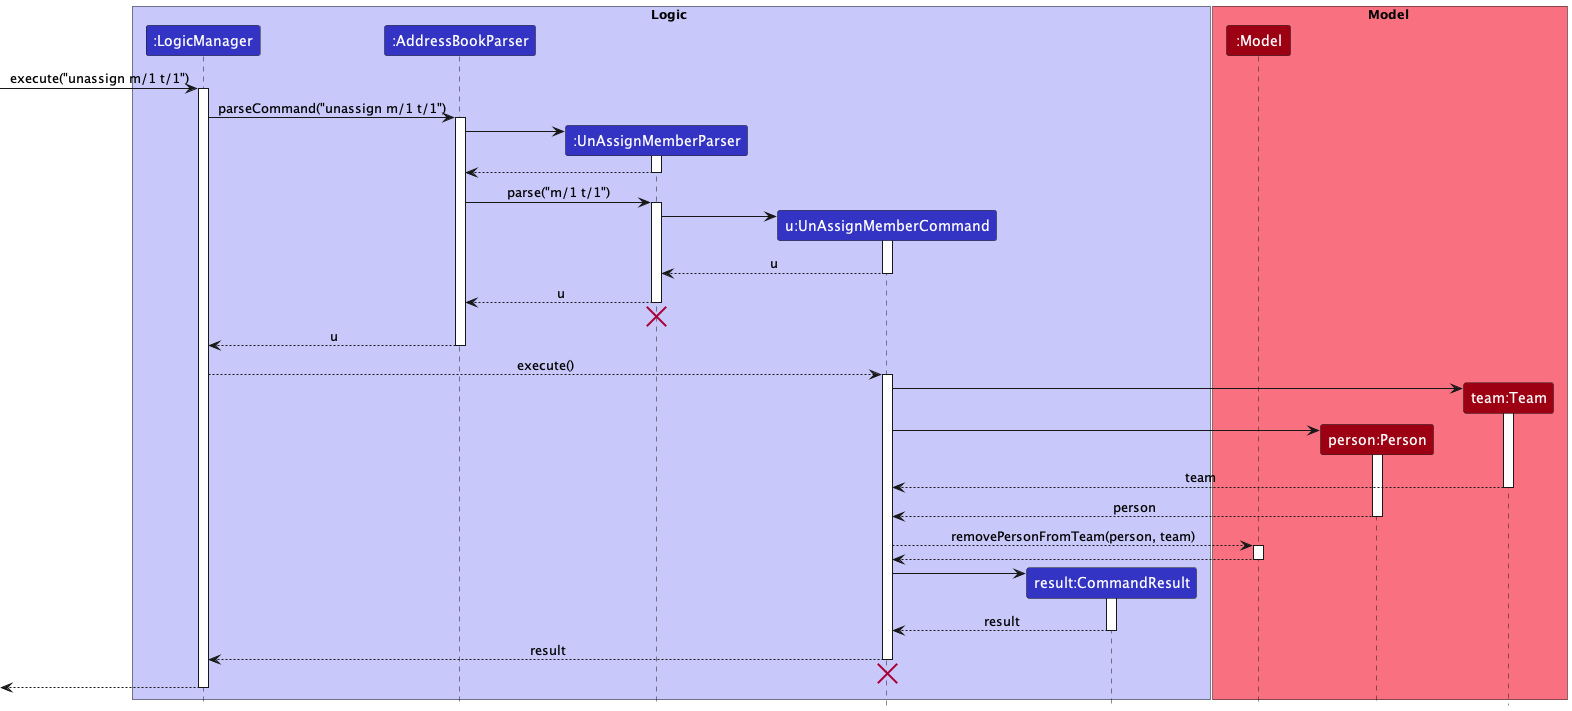
The Unassign Member Feature allows the user to unassign a person from an existing team in EZLead.
Given below is an example usage scenario and how the Unassign Member mechanism behaves at each step.
Step 1. The user executes unassign m/1 t/1 to unassign the first person as a member from the first team.
Step 2. The UnAssignMember command is created by the parser using the given member’s index (global person index) and
team’s index. It calls Model#removePersonFromTeam to remove the person from given team.
The following sequence diagram shows how the unassign member operation works:
Add Task Feature
Implementation
The add task feature adds a task into a team and this change is reflected in the Graphical User Interface.
The user may specify a deadline to be associated with the task (i.e. deadline is optional).
The deadline is implemented using Optional<LocalDate>. Thus, the deadline can be passed into other methods without knowing whether the deadline exists or not. The Task objects are stored in a UniqueTaskList.
Given below is an example usage scenario.
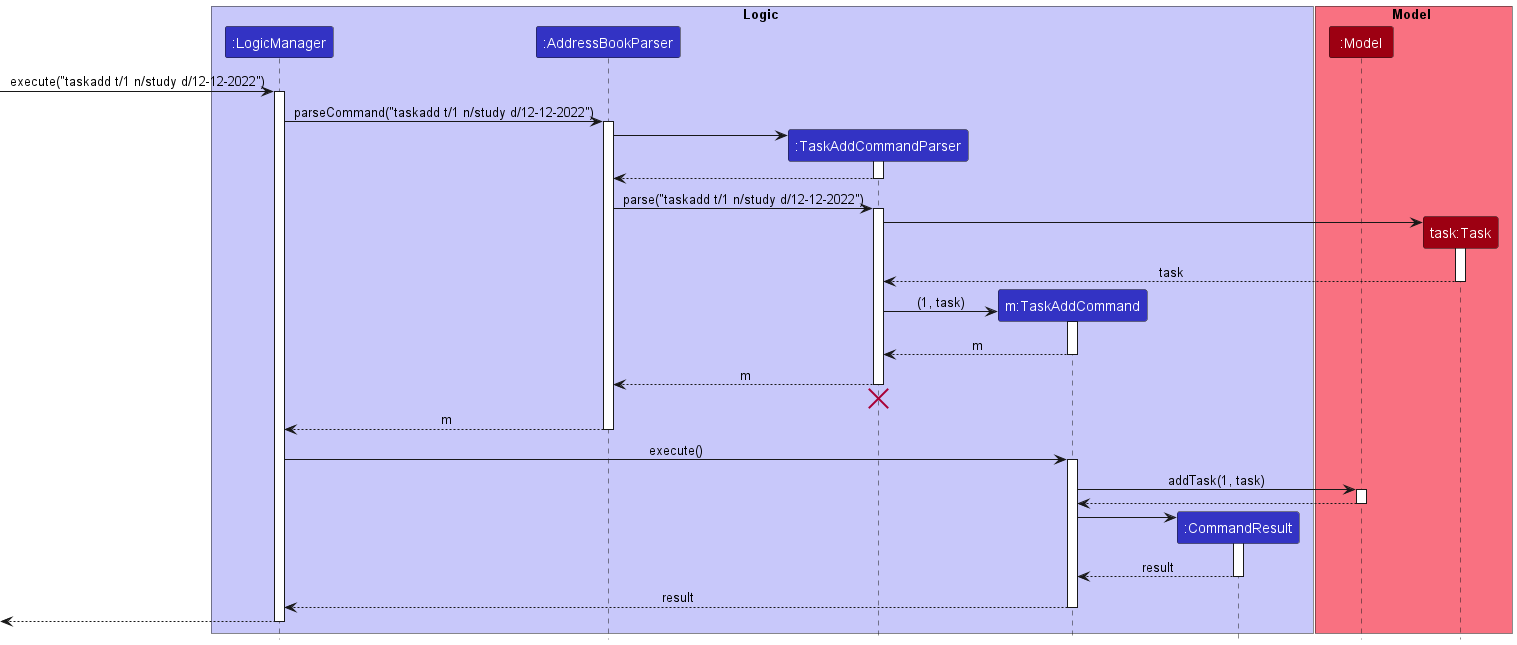
Step 1. The user creates the task using the taskadd command, executing taskadd t/1 n/study d/12-12-2022 to add the task “study” to team 1, with 12th December 2022 as the deadline.
The following sequence diagram shows how the add task operation works:
Mark Task Feature
Implementation
The mark task feature marks a task as completed and this change is reflected in the Graphical User Interface.
Given below is an example usage scenario
Step 1. The user creates the tasks and assign it to a team using the taskadd command. The new task created will be initialized with the property isDone to be false.
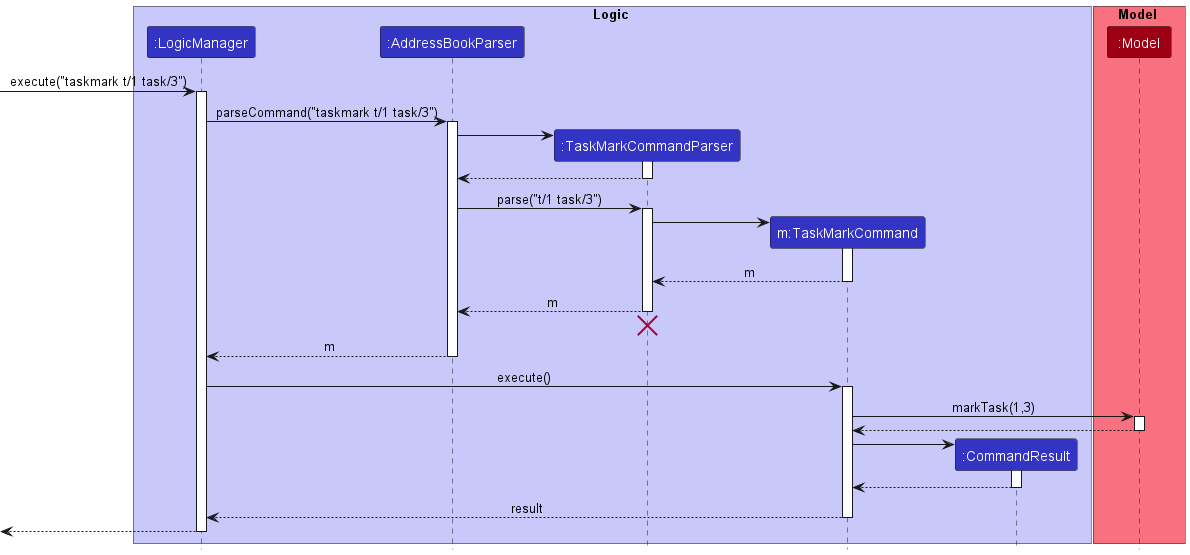
Step 2. After the task is completed, the user want to mark the task as done. The user then executes taskmark t/1 task/3 to mark the 3rd task in the 1st team as completed. This would be reflected in the GUI.
Step 3. The user realised that there is some error in the task and wants to unmark it. The user then executes taskunmark t/1 task/3 to unmark the 3rd task in the 1st team.
The following sequence diagram shows how the mark task operation works:
Edit Task Feature
Implementation
The edit task feature updates the details (can either be name, deadline, or both) of the task to the new details given by the user and this change is reflected in the Graphical User Interface.
Given below is an example usage scenario:
Step 1. The user creates the task and assign it to a team using taskadd command. The name of the task provided by the user is stored as Name in the Task class.
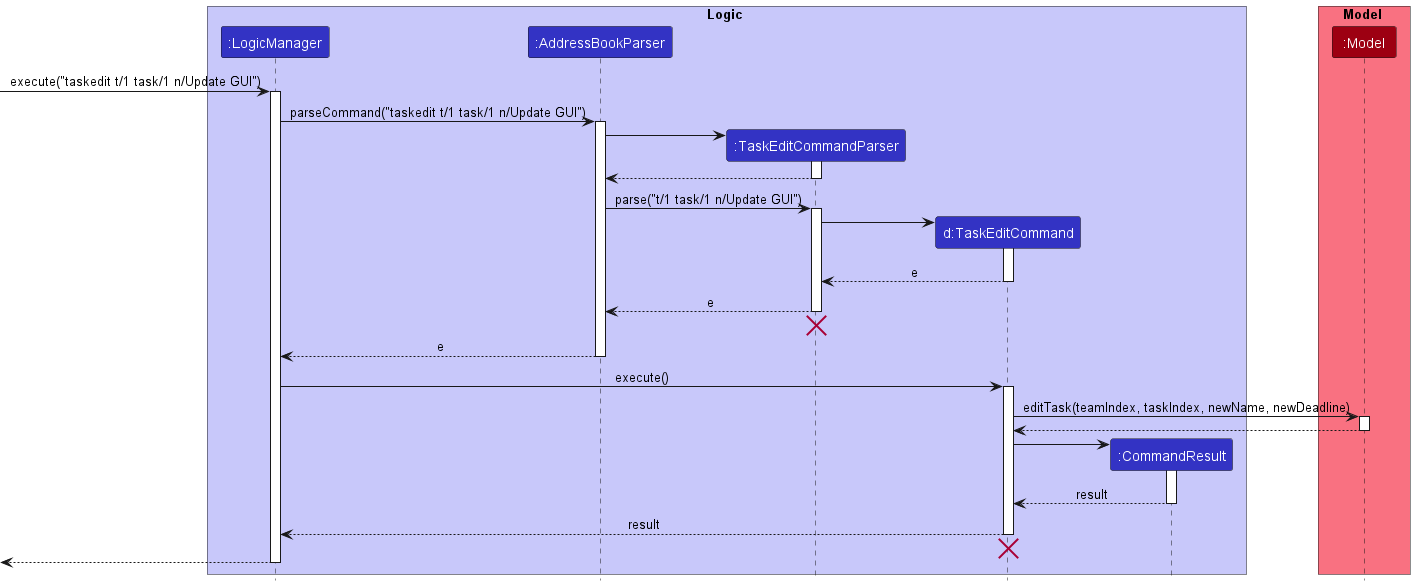
Step 2. The user might want to update the name of the task in the future. The user then executes taskedit t/1 task/1 n/update GUI to update the name of the task from the previous name to the new name provided by the user. The taskedit command will call Model#getFilteredTeamList(), which then gets the specified task from the UniqueTaskList. The specified task in team 1 would be updated to the new name by keeping all the other task details the same. Model#updateFilterPersonList is called to update the team with the new task name and this would be reflected in the gui.
The following sequence diagram shows how the edit task operation works:
Delete Task Feature
Implementation
The delete task feature deletes the task from the specified team given by the user and this change is reflected in the Graphical User Interface.
Given below is an example usage scenario:
Step 1. The user creates the task and assign it to a team using taskadd command. The tasks are stored in the UniqueTaskList for each Team.
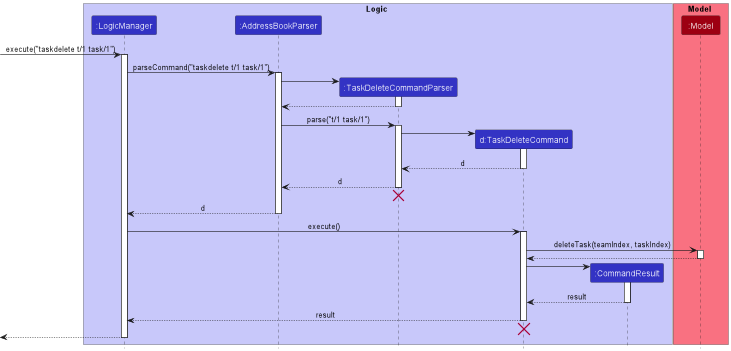
Step 2. The user might want to delete the task to remove the unwanted task in the future. The user then executes taskdelete t/1 task/1 to delete the first task from the first team. The taskdelete command will call Model#getFilteredTeamList(), which then gets the specified task from the UniqueTaskList. The specified task in team 1 would be deleted from the taskList. Model#updateFilterPersonList is called to update the team with the deletion and this would be reflected in the GUI.
The following sequence diagram shows how delete task operation works:
Documentation, logging, testing, configuration, dev-ops
Appendix: Requirements
Product scope
Target user profile: Tech Lead managing multiple teams in a software company and designating different tasks to teams
- Experienced in using applications
- has a need to manage a significant number of teams
- prefer desktop apps over other types
- can type fast
- has a need to distribute and track a significant number of tasks
Value proposition: Create teams and distribute members amongst teams. Assign and track tasks to teams.
User stories
Priorities: High (must have) - * * *, Medium (nice to have) - * *, Low (unlikely to have) - *
| Priority | As a … | I can … | So that I can… |
|---|---|---|---|
* * * |
tech lead | change the team structure | manage the teams (EPIC) |
* * * |
tech lead | create a new team | |
* * * |
tech lead | delete a team | remove unwanted teams |
* * * |
tech lead | edit the name of the team | keep the team information up to date |
* * * |
tech lead | add members to a team | update the team when a new member joins |
* * * |
tech lead | remove members from a team | keep the team information up to date |
* * * |
tech lead | edit the information of members | update their information when there is a change |
* * * |
tech lead | manage the tasks for the company | have an overview of the task in the company (EPIC) |
* * * |
tech lead | create a task | |
* * * |
tech lead | delete a task | remove unwanted tasks |
* * * |
tech lead | update a task name | respond to changes in the requirements |
* * |
tech lead | set the status of the task to complete | know which task is completed |
* * |
tech lead | set the status of the task to not complete | know which task is not completed |
* * |
tech lead | set a deadline for the task | know when the task should be completed |
* * |
tech lead | see the progress of the team | know the actively performing teams |
Use cases
(For all use cases below, the System is the EZLead and the Actor is the Tech Lead, unless specified otherwise)
Use case: UC1 - Create a new team
Actor: Tech Lead
MSS
- Tech Lead specifies the name of the team.
- EZLead create a new team object with the specified team.
Extensions
-
1a. Team with the same name already exists.
-
1a1. EZLead throws an error signifying duplicate name.
Use case resumes from step 1.
-
Use case: UC2 - Assigning members into a team
Actor: Tech Lead
Prerequisites: A team exist
MSS
- Tech Lead specifies the member to add into which team.
- EZLead add that member to the team.
Step 1 and 2 is repeated until all members have been added
Extensions:
-
1a. Member already assigned to the team
-
1a1. EZLead throws an error signifying duplicate member
Use case continues at step 1.
-
-
1b. Member does not exist in the app
-
1b1. EZLead throws an error signifying member does not exist
Use case continues at step 1
-
Use case: UC3 - Deleting Team
Actor: Tech Lead
Prerequisites: A team exist
Guarantee: Selected Team will be deleted from EZLead
MSS
- Tech Lead specifies the team being deleted.
- Team deleted from EZLead’s database.
Extensions:
-
1a. Tech Lead enter wrong command
-
1a1. EZLead display error message
Use case ends
-
-
1b. Team does not exist in EZLead’s Database
-
1b1. EZLead informs Tech Lead that the team does not exist
Use case ends
-
Use case: UC4 - Renaming a team’s name
Actor: Tech Lead
Prerequisites: A team exists
Guarantee: Selected team is renamed to the new given name
MSS
- Tech Lead specifies the old team and the new team name.
- EZLead updates the name of the team.
Extensions:
-
1a. Tech Lead enters the wrong command.
-
1a1. EZLead displays an error message.
Use case ends.
-
-
1b. Old team does not exist in EZLead’s database.
-
1b1. EZLead displays an error message.
Use case ends.
-
-
1c. new name is already used by another team.
-
1c1. EZLead displays an error message.
Use case ends.
-
Use case: UC5 - Removing team members from a team
Actor: Tech Lead
Prerequisites: A team with existing members exists
Guarantee: Selected team member is removed from the selected team.
MSS
- Tech Lead specifies the team and the team member to be removed.
- EZLead removes the team member from the team.
Extensions:
-
1a. Specified team does not exist.
-
1a1. EZLead displays an error message.
Use case ends.
-
-
1b. Specified team member does not exist.
-
1b1. EZLead displays an error message.
Use case ends.
-
Use case: UC6 - Creating a task item
Actor: Tech Lead
Prerequisites: A team exists
MSS
- Tech Lead specifies the team and the task.
- EZLead creates a new task object associated to the specified team.
Extensions:
-
1a. Specified team does not exist.
-
1a1. EZLead displays an error message.
Use case ends.
-
Use case: UC7 - Deleting a task item
Actor: Tech Lead
Prerequisites: A team exists
MSS
- Tech Lead specifies the team and the task.
- EZLead removes the task associated to the specified team.
Extensions:
-
1a. Specified team does not exist.
-
1a1. EZLead displays an error message.
Use case ends.
-
-
1b. Specified task does not exist.
-
1b1. EZLead displays an error message.
Use case ends.
-
Use case: UC8 - Editing a task name
Actor: Tech Lead
Prerequisites: A team exists
MSS
- Tech Lead specifies the team, the task and the new task name.
- EZLead updates task name associated to specified task of the team.
Extensions:
-
1a. Specified team does not exist.
-
1a1. EZLead displays an error message.
Use case ends.
-
-
1b. Specified task does not exist.
-
1b1. EZLead displays an error message.
Use case ends.
-
Use case: UC9 - Marking a task item as done
Actor: Tech Lead
Prerequisites: A team exists
MSS
- Tech Lead specifies the team and the task to be marked as done.
- EZLead marks the task associated to specified team as done.
Extensions:
-
1a. Specified team does not exist.
-
1a1. EZLead displays an error message.
Use case ends.
-
-
1b. Specified task does not exist.
-
1b1. EZLead displays an error message.
Use case ends.
-
Use case: UC10 - Marking a task item as not done
Actor: Tech Lead
Prerequisites: A team exists
MSS
- Tech Lead specifies the team and the task to be marked as not done.
- EZLead marks the task associated to specified team as not done.
Extensions:
-
1a. Specified team does not exist.
-
1a1. EZLead displays an error message.
Use case ends.
-
-
1b. Specified task does not exist.
-
1b1. EZLead displays an error message.
Use case ends.
-
Non-Functional Requirements
- Should work on any mainstream OS as long as it has Java
11or above installed. - Should be able to hold up to 500 team members without a noticeable sluggishness in performance for typical usage.
- Should be able to hold up to 1000 tasks without a noticeable sluggishness in performance for typical usage.
- Should be able to hold up to 100 teams without a noticeable sluggishness in performance for typical usage.
- Each operation should be completed within 0.5 second so that the tech lead can add tasks quickly
Glossary
- Mainstream OS: Windows, Linux, Unix, OS-X
- Private contact detail: A contact detail that is not meant to be shared with others
Appendix: Instructions for manual testing
Given below are instructions to test the app manually.
Note: These instructions only provide a starting point for testers to work on;
testers are expected to do more exploratory testing.
Launch and shutdown
-
Initial launch
1.1. Download the jar file and copy into an empty folder
1.2. Double-click the jar file
Expected: Shows the GUI with a set of sample contacts, teams and tasks. The window size may not be optimum. -
Saving window preferences
2.1. Resize the window to an optimum size. Move the window to a different location. Close the window.
2.2. Re-launch the app by double-clicking the jar file.
Expected: The most recent window size and location is retained. -
Closing the application
3.1. Type in
exitin the command input, or simply close the application by pressing the X button on the top right of the main window. Expected: The application closes.
Members
-
Listing all members
Prerequisites: Open the User List Window using the
userlistcommand.1.1. Test case:
list
Expected output in the Main Window: No change.
Expected output in the User List Window: The list shows all members. -
Adding a new member into EZLead
Prerequisites: Open the User List Window using the
userlistcommand. Then listing all members using thelistcommand.2.1. Test case:
add n/John Doe p/99853657 e/john@gmail.com a/414, North Bridge Ave 5, #09-86 t/friends t/owesMoney
Expected output in the Main Window: New person added message and the person’s details.
Expected output in the User List Window: New person added into the bottom of the list.2.2. Test case:
add n/John Doe
Expected output in the Main Window: Error message for invalid command format. -
Editing a member’s details
Prerequisites: Open the User List Window using the
userlistcommand. Then listing all members using thelistcommand. There should also be at least 1 person in the User List window.3.1. Test case:
edit 1 n/Johny p/91234567 e/johndoe@example.com
Expected output in the Main Window: Person edited message and the person’s current details after the editing. Also updates the person’s details wherever the person appears in any team.
Expected output in the User List Window: The person’s details are updated.3.2. Test case:
edit 1
Expected output in the Main Window: Error message for no editable field provided. -
Deleting a member
Prerequisites: Open the User List Window using the
userlistcommand. Then listing all members using thelistcommand. There should also be at least 1 person in the User List window.4.1. Test case:
delete p/1
Expected output in the Main Window: Person deleted message and the person’s details. Also deletes the person wherever the person appears in any team.
Expected output in the User List Window: The person is deleted.4.2. Test case:
delete p/2
Expected output in the Main Window: Error message for invalid index. -
Finding a member
Prerequisites: Open the User List Window using the
userlistcommand. Then listing all members using thelistcommand. There should also be at least 1 person in the User List window.5.1. Test case:
find Alex
Expected output in the Main Window: No change.
Expected output in the User List Window: The list only shows people that has Alex in any of its fields.
Teams
-
Adding a new team into EZLead
1.1. Test case:
create n/Frontend
Expected output in the Main Window: New team added message and a new team is added into the Main Window. -
Editing a team’s name
Prerequisites: There should be at least 1 team in the Main window.
2.1. Test case:
editteam t/1 n/Backend
Expected output in the Main Window: Team edited message and the new team name is reflected in the Main Window. -
Deleting a team
Prerequisites: There should be at least 1 team in the Main window.
3.1. Test case:
delteam 1
Expected output in the Main Window: Team deleted message and the team is deleted from the Main Window. -
Assigning a member to a team
Prerequisites: There should be at least 1 team in the Main window, and 1 person in the User List window.
4.1. Test case:
assign m/1 t/1
Expected output in the Main Window: New person X added to team Y message. The details of that person is reflected in the member list of team. -
Unassigning a member from a team
Prerequisites: There should be at least 1 team in the Main window, and 1 person is already assigned to the team.
5.1. Test case:
unassign m/1 t/1
Expected output in the Main Window: Person X removed from team Y message. The details of that person is removed from the member list of the team.
Tasks
-
Adding a new task to a team
1.1. Test case:
taskadd t/1 n/Create GUI d/12-12-2022
Expected output in the Main Window: New task added message and a new task is added into the Main Window with the specified deadline.1.2. Test case:
taskadd t/1 n/Review PR
Expected output in the Main Window: New task added message and a new task is added into the Main Window with a blank deadline. -
Editing a task’s details
Prerequisites: There should be at least 1 team with at least 1 assigned task in the Main window.
2.1. Test case:
taskedit t/1 task/1 n/Update PR d/01-01-2023
Expected output in the Main Window: Task edited message and the new task details is reflected in place of the old details. -
Deleting a task
Prerequisites: There should be at least 1 team with at least 1 assigned task in the Main window.
3.1. Test case:
taskdelete t/1 task/1
Expected output in the Main Window: Task deleted message and the task is deleted from the team’s task list. -
Marking a task as done
Prerequisites: There should be at least 1 team with at least 1 assigned task in the Main window.
4.1. Test case:
taskmark t/1 task/1
Expected output in the Main Window: Task marked as done message. The task now has a tick mark besides its name. -
Marking a task as not done
Prerequisites: There should be at least 1 team with at least 1 assigned task in the Main window.
5.1. Test case:
taskunmark t/1 task/1
Expected output in the Main Window: Task marked as not done message. The box next to the name of the task is now blank.